


VXI Test Systems, Components and Frequently Asked Questions Page.
Our favorite system is the Hewlett Packard / HP /Agilent E1300A, E1301A, E1301B B size VXI Mainframe. This system is small, versatile, widely available, easy to use and cost effective. Follows is a list of some of the versions of the HP / Agilent E1300 series mainframe and plug in cards:
Manuals:
On occasion we will post manuals that were have scanned from paper (image only, no OCR) in Acrobat format.
 The base configuration of the E1300 Series B-Size VXI Mainframe includes 7 External B-Size Slots, 3 external A-Size slots and 3 internal B-Size slots, VME Buss P1 only. One internal B-Size slot (Slot 0) is occupied by an 8 MHz Motorola 68000 16 bit controller. 2 other internal B-Size slots available for optional internally mounted E1326A/B VXI DMM. HPIB Interface. RS232 Interface supporting 300, 1200, 2400, 4800, 9600 and 19200 Baud. 115 / 230 Volts AC 50/60 Hz Power. 256 KBytes Battery Backed non-volatile RAM (some early production instruments had only 64 KByte). Available Options: Internally installed E1326A/B 5 1/2 Digit DMM, 512 KByte 1 MByte or 2 MByte Non Volatile RAM, DC Power, IBASIC Controller, 720 KByte or 1.44 MByte Floppy disk Drive (Requires IBASIC Controller) 10, 20 or 40 MByte Fixed Disk Drive (Requires IBASIC Controller).
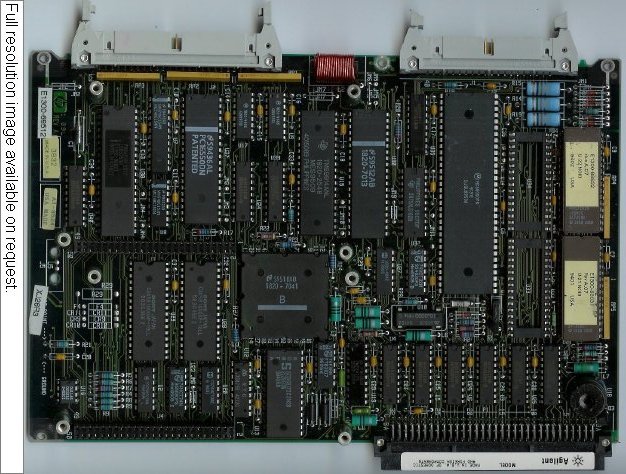
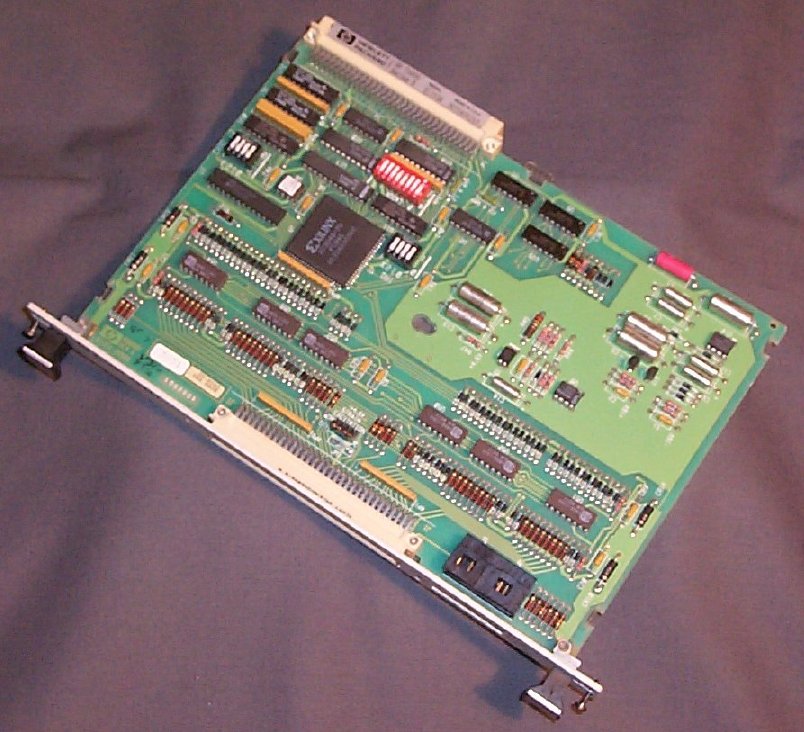
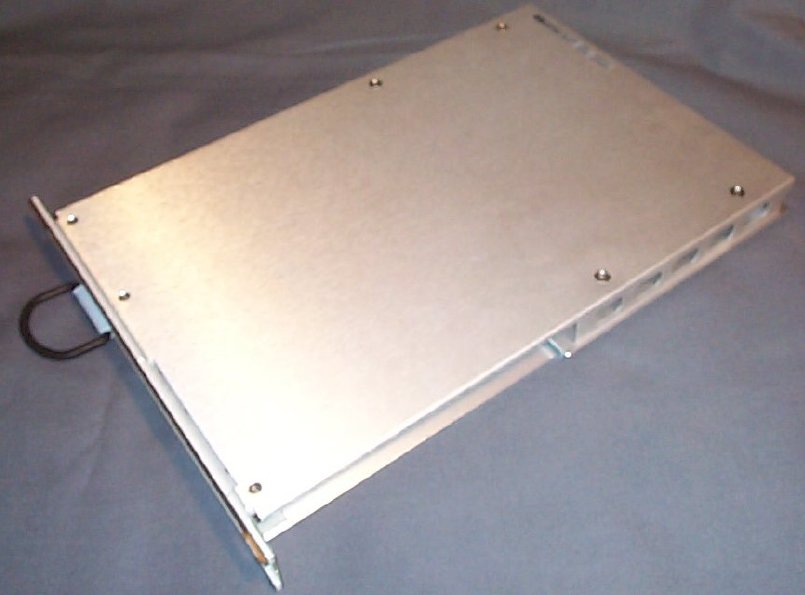
The image included here is of the E1300A/B series internal MC68000 based controller shown without an optional memory board installed. Referring to the large image that is linked to the thumbnail the connector on the lower right is the VXI/VME Bus interface connector. The connector on the upper right is the communication and trigger interface connector, this connector has the HP-IB interface, RS-232 interface, Event In, Trigger Out and Pacer Out signals. The connector on the upper left provides the connections for the front panel keyboard and Vacuum Florescent Display. The optional memory expansion cards may be installed in the two sockets in the lower left corner of the board. The board pictured is a late production unit shown removed from the mainframe.

Front Panel Keyboard, 2 line by 40 character Vacuum Florescent display.
Front panel keyboard, 2 line by 40 character Vacuum Florescent display. Later model with dual fan cooling and automatic slot IACK daisy chaining.
IBASIC controller, floppy disk drive and optional hard disk drive. Allows stand alone operation of the mainframe with automatic test sequences and data logging. User developed programs may be uploaded through the HPIB, serial port, floppy drive or entered through the front panel keyboard. IBASIC option also allows the mainframe to be the System Controller and control external HPIB enabled instruments under IBASIC.
The E1306A Command Module is a two slot B-Size VXI module designed primarily for installation and operation in the HP / Agilent E1302A 20 slot B-size mainframe. The E1306A command module provides VXI slot 0 functions and VXI resource management. Access to the VXI system is provided by the E1306A though the HPIB interface or alternatively through the E1306A serial interface. The E1306A will function in slot 0 of any B-Size VXI or VME mainframe. The E1306A is a derivative of the E1300A/E1300B controller found in the E1301A and E1301B mainframes. The printed circuit board assembly in the E1306A is the same as the that in the E1301B mainframe differing only in the firmware and the absence of the display and keyboard interface. The circuit card in the E1306A occupies the lower half of the module. The memory and clock Ni-Cad battery pack is attached the top shield cover of the module. The extended upper half of the front panel holds the HPIB, RS232, Event In, Pacer Out, and Trigger Out connectors. As with the E1301B internal controller the E1306A is based on an 8 MHz Motorola 68000 16 bit microprocessor. The E1306A has the same basic features as the E1301B controller except it has no front panel or keyboard functions, the HPIB interface can not normally act as the system controller and embedded HP Instrument Basic (IBASIC) is not an option for the E1306A Command Module.
The Hewlett Packard (now Agilent) E1324A A-Size RS422 / RS232 Serial Communications Interface
The Hewlett Packard (now Agilent) E1326A 5 1/2-Digit Multimeter is a lot like the E1326B Multimeter described below.
The Hewlett Packard (now Agilent) E1326B 5 1/2-Digit Multimeter is a VXI / VME 2 Slot B-Size Multimeter can be used stand-alone, or combined with multiplexers (for example, HP E1345A/46A/47A/51A/52A/55A/56A/57A/58A) and configured as a scanning multimeter. Available multimeter functions are DC Voltage, RMS AC voltage, 2-Wire Resistance (scanning multimeter only), 4-Wire Resistance and Temperature using thermistors, RTDs or thermocouples. When installed in a mainframe with an HP / Agilent E1300 or E1400 series VXI controller, the Multimeter is controlled through SCPI commands. When used with other controllers or embedded computers the E1326B may be programmed either using register based commands or with loaded VISA or SCPI drivers. The E1326B occupies two B-Size slots or can be internally installed in an E1300 Series mainframe thus saving 2 external slots for other instruments. The E1326B has good speed and accuracy comparable to the venerable HP 3478A.
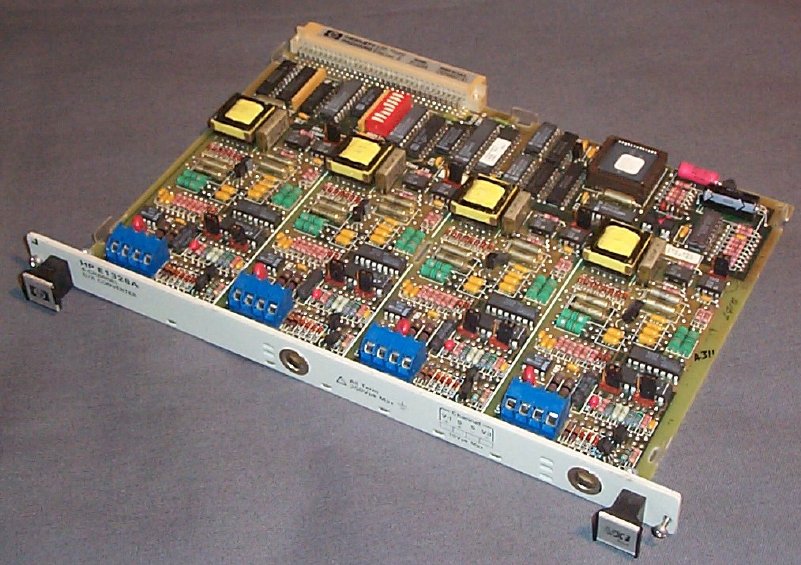 The Hewlett Packard (now Agilent) E1328A 4 channel Digital to Analog converter features four isolated 16 bit D/A channels that may be configured for constant voltage or constant current mode operation by jumpers located on the card. The output voltage range is +/-10.922 Vdc and the output current range is +/-21.84 mAdc in calibrated mode, the output range is typically +/-12 Vdc or +/-24 mAdc in non-calibrated mode. The outputs of the E1328A may be connected in series or parallel to obtain higher output voltage or current. The E1328A features all electronic calibration with the calibration constants stored in on board memory. The electronic calibration procedure is simple enough to be performed on a daily basis and requires about 30 seconds to perform in system using an IBASIC program running on the system controller. Output connections are accessed through hole in the front panel and connections are made at screw terminals on the component card. Although the E1328A is a register based instrument, SCPI drivers are embedded (pre loaded) in the Hewlett Packard E1300 and E1400 series controller modules.
 The Hewlett Packard (now Agilent) E1330A Quad 8 Bit Digital I/O
 The Hewlett Packard (now Agilent) E1330B Quad 8 Bit Digital I/O
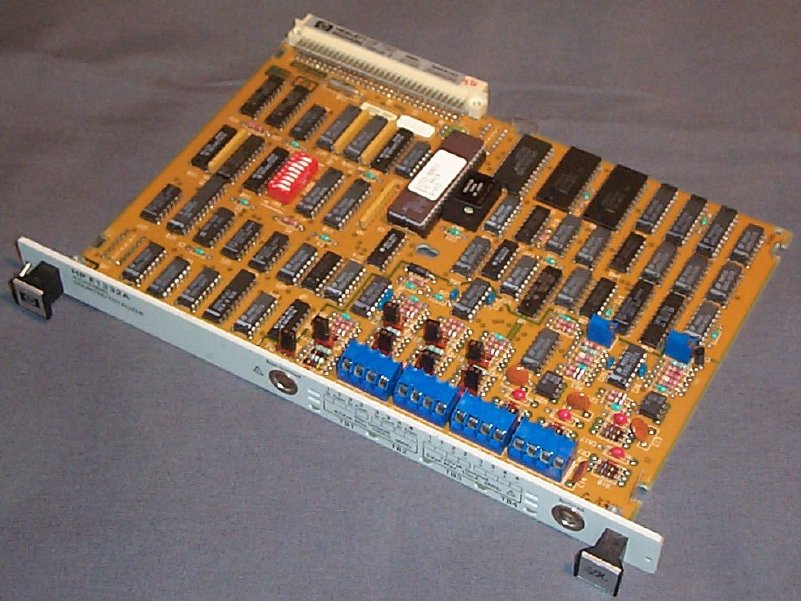 The Hewlett Packard (now Agilent) E1332A Four Channel Counter / Totalizer
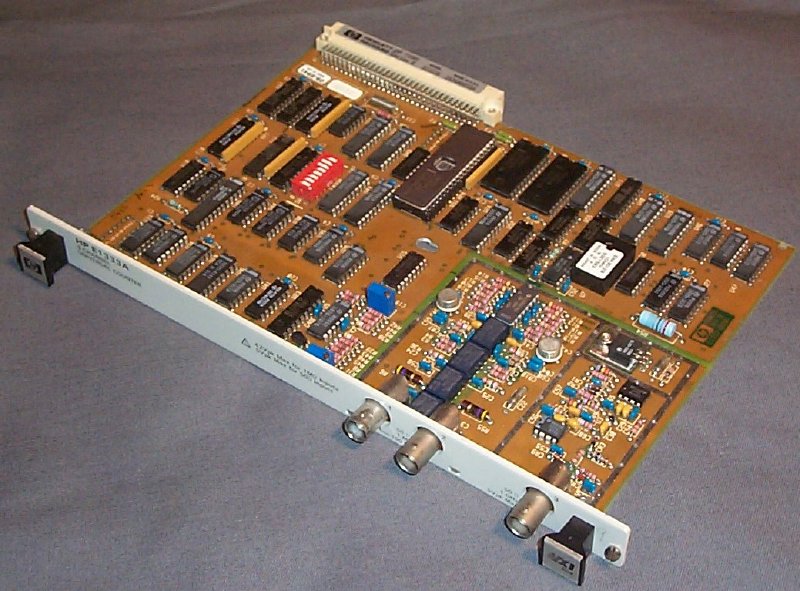 The Hewlett Packard (now Agilent) E1333A Three Channel Universal Counter
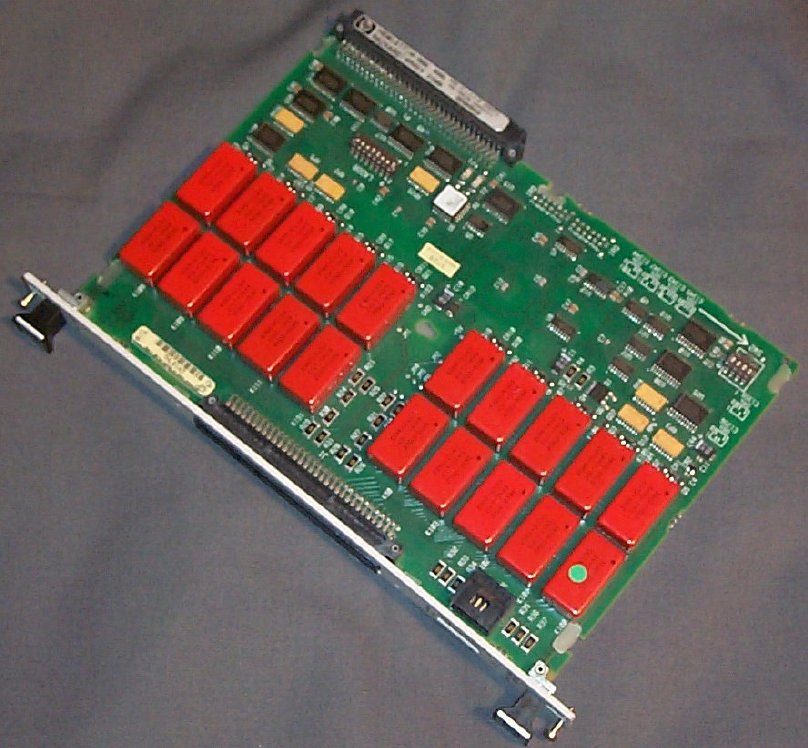
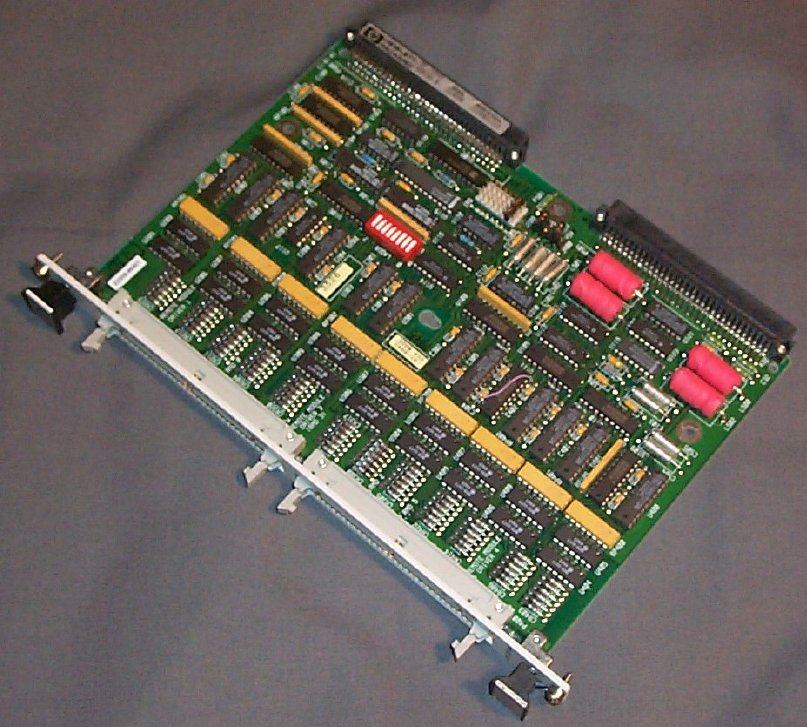 The Hewlett Packard (now Agilent) E1339A 72 Channel Relay Driver
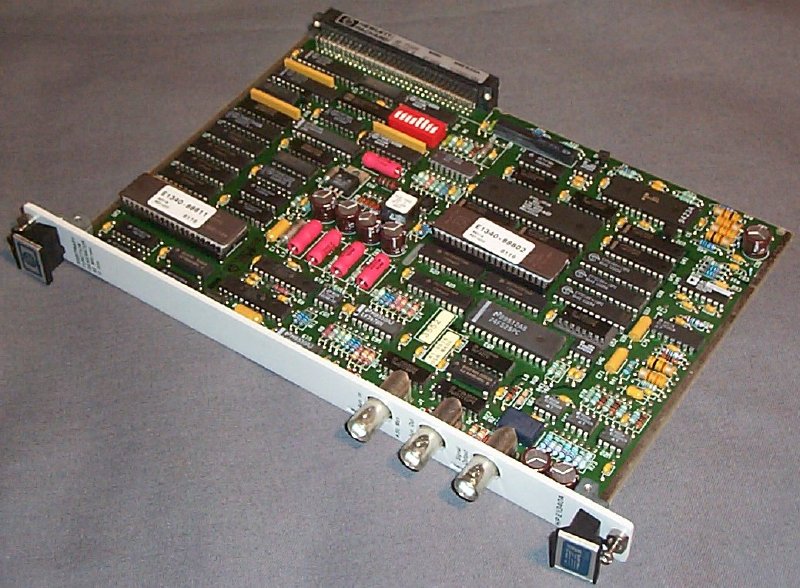 The Hewlett Packard (now Agilent) E1340A 42 MS/sec 12 bit Arbitrary Function Generator
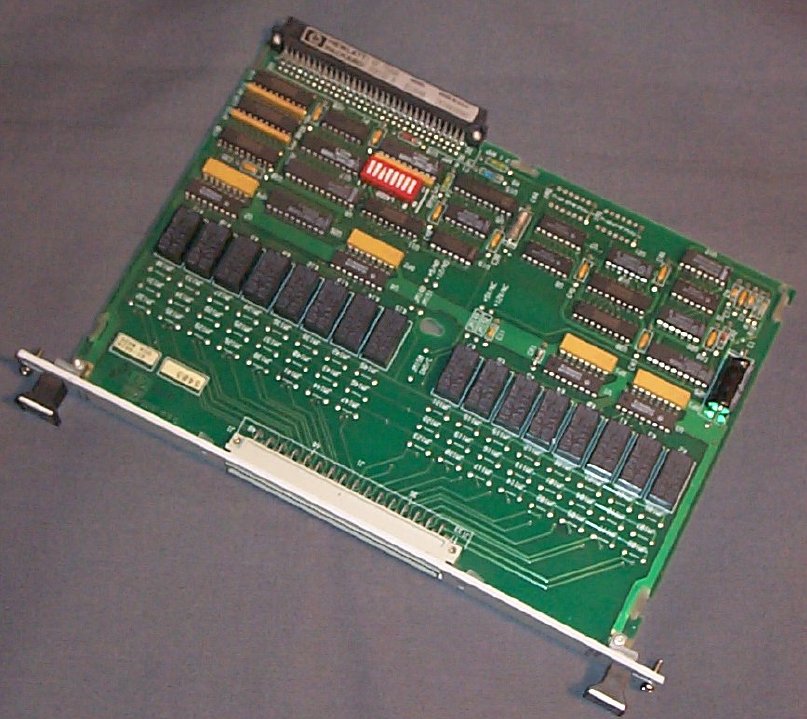
 The Hewlett Packard (now Agilent) E1345A Series Relay Multiplexors
 The Hewlett Packard (now Agilent) E1351A Series FET Multiplexors
 The Hewlett Packard (now Agilent) E1364A 16 Channel Form C Switch
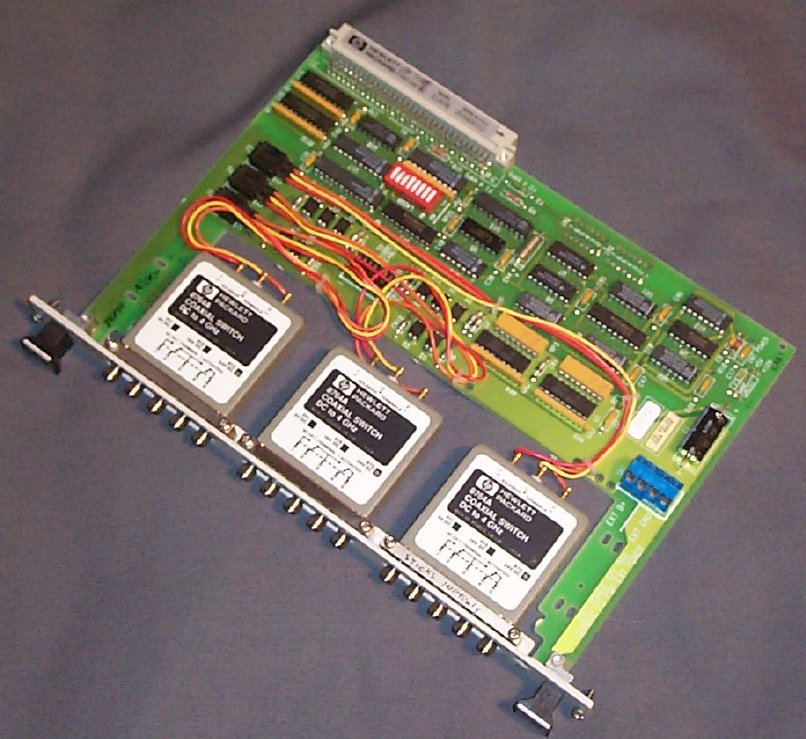 The Hewlett Packard (now Agilent) E1369A Series Microwave Switch Drivers
 The Hewlett Packard (now Agilent) E1403B B-Size VXI / VME to C-Size VXI module adapter adapts a B-Size VXI card to a C-Size slot for use in an E1401A, E1401B E1421A, E1421B or other C-Size VXI Mainframe. The metal frame houses a buffered, active extender card for the VXI / VME P1 connector, the E1403B does not support the VXI / VME P2. The E1403B does not support VME / VXI slot zero or commander cards, Full support for any B-Size VME / VXI P1 slave card. The E1403B is extracted from the mainframe using the "D" pull ring permanently attached to the front of the extender module.
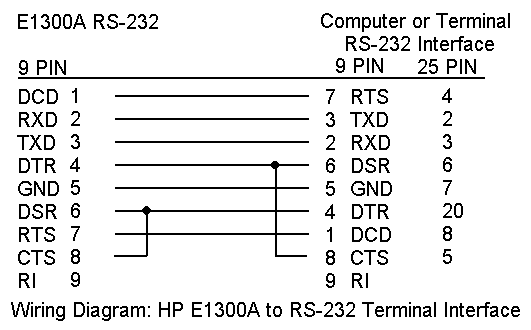
Response: The E1300A serial port follows the electrical conventions of RS-232D. The RS-232 interface of the E1300A is configured as a "Data Terminal", the same as a PC or Terminal and thus a "Null Modem" connection is required between the Terminal or PC and the E1300A VXI mainframe. The connection must be made using a Null Modem adapter or cable or a cable constructed per the illustration below.
HP E1300A RS-232 factory default settings:
If communications can not be established from the terminal or PC with the E1300A VXI mainframe connected through a null modem cable, null modem adapter or cable as illustrated above you can restore the factory defaults by following the instructions below.
Restoring the E1300A RS-232 serial interface to factory defaults:
Warning: If you restore the factory defaults this will clear the User and System non-volatile RAM areas.
With the E1300A mainframe power OFF connect a terminal (VT100 or VT52 emulation works best) set to the E1300A factory default setting listed above. Power ON the mainframe and press and hold the CTRL and the R keys (CTRL-R) while the mainframe performs the "Testing ROM" portion of the self test. The ROM self test occurs during the first 3 seconds after the power is turned on to the mainframe. You must press CTRL-R during the "Testing ROM" portion of the self test. After the self test has completed the mainframe should display "Select an Instrument".
Response: Check the setting of the logical address switches on the VXI cards, no two cards may be set to the same logical address and each address must be an integer multiple of 8, for example 24, 32, 40, 48 etc. up to 232. Exceptions are multiple module instruments, for example a scanning multimeter configuration where an E1326B is set to Logical Address 24 and one or more multiplexors and or switches are set to consecutive addresses of 25, 26, 27 etc.. The logical addresses of the cards need not be contiguous, cards could be set for addresses 24, 32, 64, 72 and 96 for example and this will work fine in an HP E130X mainframe.
If the logical address of all the cards in the system are correct and you have an older E1300A or E1301A mainframe you may need to set the VME IACK (Interrupt Acknowledge) Switches on the back plane board inside the mainframe. Later production mainframes handle the IACK bypass, or daisy chaining, automatically but the older mainframes may have dip switches on the VME back plane that must be set by the user. The IACK bypass switches are accessible without disassembling the mainframe by removing any cards, adapters and covers installed in the A-Size slots 10, 11 and 12 at the rear of the instrument. Empty Mainframe slots that are between installed VXI cards must have their IACK switches set to "Empty", Mainframe slots that are occupied by VXI Cards must have their IACK bypass switches set to "Full" See the illustrations for setting of the IACK Bypass Switches and E1300 Slot assignments.
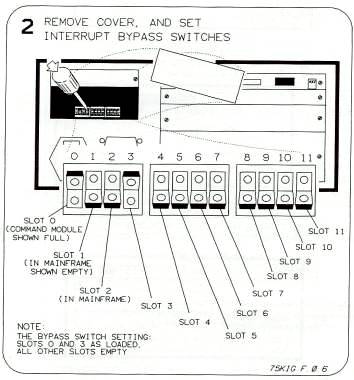 Click for illustration of HP E1300X IACK Bypass Switches
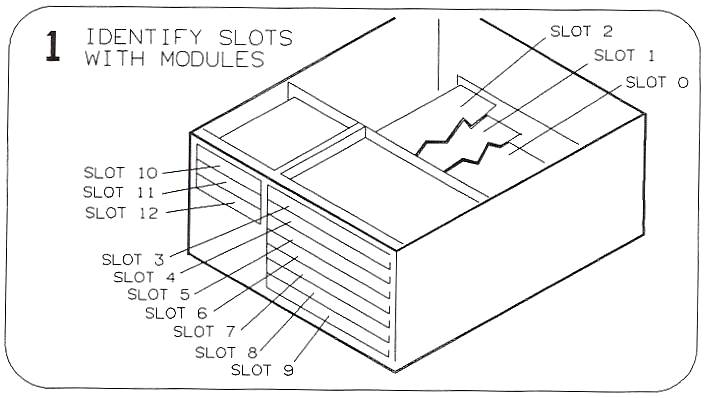 Click for illustration of HP E1300X Slot Assignments
If you plan to install cards contiguously in the mainframe starting at slot 3 and continuing with slot 4, 5, 6 ,7 etc. the IACK Bypass switches for these slots can be set to "Full" as the setting of switches for slots greater than the lowest numbered occupied slot have no effect.
Response: The unit was completely checked out before we shipped. Are you using the Null Modem Cable that was shipped with the mainframe? A null modem cable or adapter is required when connecting the E1300 series mainframe to a PC serial interface, a standard RS232 cable will not work. Be sure the terminal settings on the PC are set to 9600 Baud, No Parity and 1 Stop Bit, these is the default serial interface settings and how we always ship these. Yes, if the unit we sold you actually turns out to be defective we will repair or replace it, be sure and contact us by e mail with your phone number so we can contact you and see if we can sort out your problem. Returns must be assigned an RMA number by us before return shipment. P.S. Get a real terminal emulation program like Procomm Plus and trash that hyper-terminal piece of junk.
Answer: 42
Answer: Yes. But you would have to pay us an outrageous sum of money to get one. The E1300A and E1301A manuals are hard to find and as far as we know they are not available for download from Agilent Technologies. However the E1406A is nearly identical to the E1300A, E1301A, E1301B, E1306A, E1405A and E1405B command modules in operation and functionality. The E1406A users manual may be down loaded from the Agilent Technologies Web site in Adobe Acrobat (PDF) format. Agilent Technologies Test and Measurement
One of the nice features of the Agilent E1300A, E1301A/B, E1405A/B and E1406A is their ability to be operated in a stand alone mode using the built in IBASIC controller if that option is installed. In a hostile environment a Non-Volatile RAM Disk can be configured within the instrument eliminating the need for a floppy or fixed disk drive for data logging. If you are lucky enough to have an E1300 series mainframe with the DC to DC power supply installed you can operate the VXI mainframe from a battery or 12VDC vehicle power. The E1300A (blank front panel with no display or keyboard) consumes very little power, about 40 watts with a nice compliment of cards. We have taken the guts from a few E1300As and installed them in plain VME P1 card cages making a compact data acquisition package that is 8 by 11 by 7 inches with the E1300A controller and five data acquisition cards. Using the on board 2 Megabytes of battery backed RAM and the IBASIC controller we load our data acquisition software written in IBASIC into the mainframe through the serial port, setup parameters and start execution using a palm pilot running Online, from Conklin Systems*. Collected data is stored in a file in the battery backed RAM of the E1300A controller and download as desired to the Palm Pilot. A lap top could be used as well. You could build a system like this and throw it in the trunk of your rally car monitoring eight thermocouples in the exhaust manifold, pressure transducers in the tailpipe, read the oxygen sensor output voltage, oil pressure, manifold vacuum, engine temperature, fuel flow, RPMs, speed and distance.
* This link must not be construed as an endorsement of the current version of Online being sold and supported by Conklin Systems, we have not tried it out yet. We'll down load the latest demo and give it a thorough thrashing. If we like it we will plunk down the $34.95 and post our comments here.
PC Terminal Setup:
Procomm Plus Meta Keys: To map the VT100 Terminal emulation MetaKeys in Procomm Plus to the function keys on the HP E1300 and E1400 terminal interface display use the following mapping:
FORM MAIL WILL RETURN SOON after we figure out how to stop the cybervermin from abusing it.